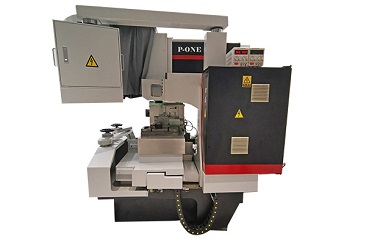

Operators must receive theoretical and practical training on optical curve grinding machines and pass the assessment to obtain the job qualification certificate before they can be qualified to operate.
I. Preparations before Processing
a) The operator must be familiar with the performance, processing range and accuracy of the machine tool in accordance with the machine tool user manual, and be proficient in the functions and operation methods of the machine tool, its numerical control device and each part of the computer.
b) Check whether all the switches, knobs and handles are in the correct positions.
c) The electrical part of the start-up control shall be preheated as stipulated.
d) Start the machine tool and let it run idle. Check the sensitivity of each switch, button, knob and handle, as well as whether the lubrication system is normal, etc.
e) Be familiar with the processing program and programming origin of the workpiece to be processed.
The pulling results in the X and Y directions shall not exceed 2 μ m/100mm.
g) Adjust the sample image so that the reference line of the sample image coincides with the reference line of the projector.
h) Adjust the up and down stroke of the grinding head so that the upper and lower limits of the stroke exceed the workpiece by 10mm.
Ii. Clamping of grinding wheels and workpieces
a) Select the appropriate grinding wheel and avoid colliding with it. For steel materials with a hardness exceeding HRC65, diamond grinding wheels are selected, while for steel materials with a hardness below HRC65, CBN grinding wheels are chosen.
b) Generally, large-diameter grinding wheels are selected. When grinding small-diameter punch pins, small-diameter grinding wheels can be used.
c) During the finishing process, check the fillet radius of the grinding wheel and then write it into the compensation parameter table.
d) The workpiece clamping should be firm and reliable. Attention should be paid to avoiding interference between the tool and the work or between the tool and the worktable during operation.
Iii. Processing Requirements
a) Before conducting the first piece processing, it is necessary to go through steps such as program inspection (trial run program), trajectory inspection, single program segment trial cutting and dimensional inspection, and select the appropriate feed rate. (Fine machining is available at 1mm/min, rough machining at 3mm/min)
b) During processing, the program must be input correctly and no unauthorized changes to the program are allowed.
c) During processing, the feed rate per tool for semi-finishing is 8 μ m, and for finishing it is 2 μ m.
d) During the processing, the operator should constantly monitor the display device. When an alarm signal is detected, the machine should be stopped promptly to eliminate the fault.
e) During processing, the control system must not be opened at will or the computer interrupted.
f) After the parts are processed, the program should be registered and kept for future use.
g) Record the origin coordinates before shutting down.
h) This process is a key processing procedure. After the workpieces processed have passed the self-inspection, they must be sent to the inspection department for special inspection.
Iv. Self-inspection Requirements and Self-Inspection Scope
Before processing, the processor should carefully read the drawings and understand the processing technology of the parts, clearly know the processing part, shape, size, positional accuracy of this process, as well as the processing content and requirements of the previous and subsequent processes.
2. Before processing the workpiece, it is necessary to check whether all the reference surfaces used in this process comply with the process and processing requirements.
3. Check whether the dimensions related to this process comply with the drawings and process requirements, and whether there is sufficient allowance for processing.
4. After the workpiece is clamped onto the worktable, for optical grinding, the sample drawing comparison method is used, and for coordinate grinding, the chart method is used to check whether the position and size related to this sequence comply with the drawing and process requirements.
After the parts are processed, it is necessary to check whether the dimensions of each processing and the relevant positions comply with the requirements of the drawings and the process.
6. At each shift handover, it is necessary to self-check whether each reference (zero position) is correct and the machining allowance. Only after passing the inspection can the workpiece be disassembled and handed over to the inspector for special inspection.